Setting up an AWS nOps account (Manual Setup)
nOps requires safe, secure, and AWS-approved access to your AWS accounts in order to give you the analysis, dashboards, and reports that you need. We only see what you want us to see in order to provide our services, no more, and we need you to give us permission first.
In order to get started with nOps, the first step is to set up an AWS account for nOps via the Automatic Setup, Manual Setup, IaaC Multi Account Setup (CloudFormation), or IaaC Multi Account Setup (Terraform). We made the setup process as easy as possible for you while complying with AWS security best practices.
This Manual Setup is used in complex environments by experienced AWS administrators who need granular control and insight into the access that nOps require.
The Manual Setup approach is also useful for administrators who want to embed nOps access into their automation.
Prerequisites
You must have Admin role permissions in the AWS Payer account before you can set up an AWS nOps account with Manual Setup.
Pro Tip: The Manual Setup is used in complex environments by experienced AWS administrators. Most customers opt to use the Automatic Setup procedure.
Configuring the AWS Payer account (Manual Setup)
To use the Manual Setup, follow these steps:
- Get the auto-generated External ID from nOps
- Setup a S3 billing bucket for Cost & Usage Reports
- Give nOps Permission and Create an IAM Policy
- Create an IAM Role
- Return to nOps to complete Manual Setup
Important information to copy and save
During this process, you should copy and save some information as you will need to enter it during the setup process. This information will be used in AWS and in nOps in order to complete the process:
- Copy the External ID auto-generated through nOps.
- Copy the ARN for IAM Policy that was created in the IAM Policy.
- Copy Report name created for the Cost and Usage Report (CUR).
- Copy Report path prefix from the S3 billing bucket creation.
Get the auto-generated External ID in nOps
When you log in to your nOps account for the first time, a pop-up screen will appear. This pop-up screen will guide you on how you can add your AWS account(s) to nOps. The screen consists of three distinct sections:
- Getting Started
- Link Cloud Accounts
- Fetching
1. On the top-right corner of your nOps account, click on your user avatar to open a drop-down list.
2. In the dropdown list, click Organization Settings. This will take you to the Cloud Accounts page.
3. To the right of the account you wish to configure, click your preferred setup option.
Getting Started
In this section, you need to select the account setup method. In the scope of this article, we will deal with the Manual Setup. Select the Manual Setup and click Next.
When you click Next, you should see a screen similar to:

Copy the External ID and save it, you will need it later on.
Important: Do not exit this page, you will return to this page later to complete the account setup.
Setup S3 billing bucket for Cost & Usage Reports
This section is divided into two steps, in the first step you will create the Cost & Usage Report, and in the second step you will create/select an S3 bucket for the Cost & Usage Report.
Create the Cost & Usage Report
In this step you will create a Cost & Usage Report (CUR) so that nOps can analyze your cost information:
- Login to your AWS Management Console account.
- Go to the Cost & Usage repports
- Click on Create Report:

- Create a report name (such as nopsbilling-daily-gzip).
- In Additional report details, check the Include resource IDs checkbox (mandatory).
- In the Data refresh settings, leave the Refresh automatically checkbox checked.
- Click Next.
When you click Next, it will take you to the Delivery options page where you will create the S3 billing bucket.
Create/Select the S3 billing bucket
AWS needs a place to save your cost and usage report. In this step, you will create an S3 bucket that secures your information:
- In the Delivery options, click Configure to open the Configure S3 Bucket dialog box.
-
In the dialog box, do one of the following:
Select an existing bucket: Use an existing bucket from your AWS Account.
or
Create a new bucket: Create a new S3 bucket to be used specifically for nOps.
Check the “The following default policy will be applied to your bucket” checkbox
- Click Save.
-
In the Report Delivery Options details:

- Enter the report path prefix (required) – Suggestion: nopsbilling
- Choose Daily (mandatory) for Time granularity.
- Select an option for Report versioning (optional) — Suggestion: Overwrite existing report.
- Select GZIP as Compression type (mandatory).
Important: You will need the Report Path Prefix name later when you are adding the AWS Account in nOps
-
Click Next.
- In the Review and Complete page, double-check your settings.
- Click Create Report.
Create the Payer account IAM policy
In this step, you’ll give nOps permission to read the Cost & Usage Report in the S3 bucket.
To manually create the IAM policy in order to allow nOps appropriate access:
- On the AWS Management Console, go to the Identity and Access Management screen.
- From the left navigation panel, click Policies.
- Click Create Policy.
- Switch to the ‘JSON’ tab and replace the existing JSON script with the script provided in nOps IAM Policy.
- Click Next: Tags (optional).
- Click Next: Review.
- Click on ‘Review Policy’.
- Copy and save the ARN of the IAM Policy. This will be used later when you create the IAM Role.
- Provide a name and description for the policy.
- Click on ‘Create Policy’.
Make sure you replace <paste-bucket-name-here> with the name of the S3 bucket that houses the Cost & Usage Report to ensure policy efficacy.
You will attach this to the IAM Role that you will create for nOps in the next step.
Creating the IAM role
IMPORTANT: You will need to enter the nOps auto-generated ID to create the IAM Role.
In order to allow the nOps SaaS application to use the IAM policy you just created, you need to create an IAM role.
To create a new role:
- On the AWS Management Console, go to the Identity and Access Management screen.
- From the left navigation panel, click Roles.
- Click Create Role.
- On Select trusted entity page, select AWS account.
- Click Another AWS account.
-
For Account ID enter the nOps account ID (202279780353).
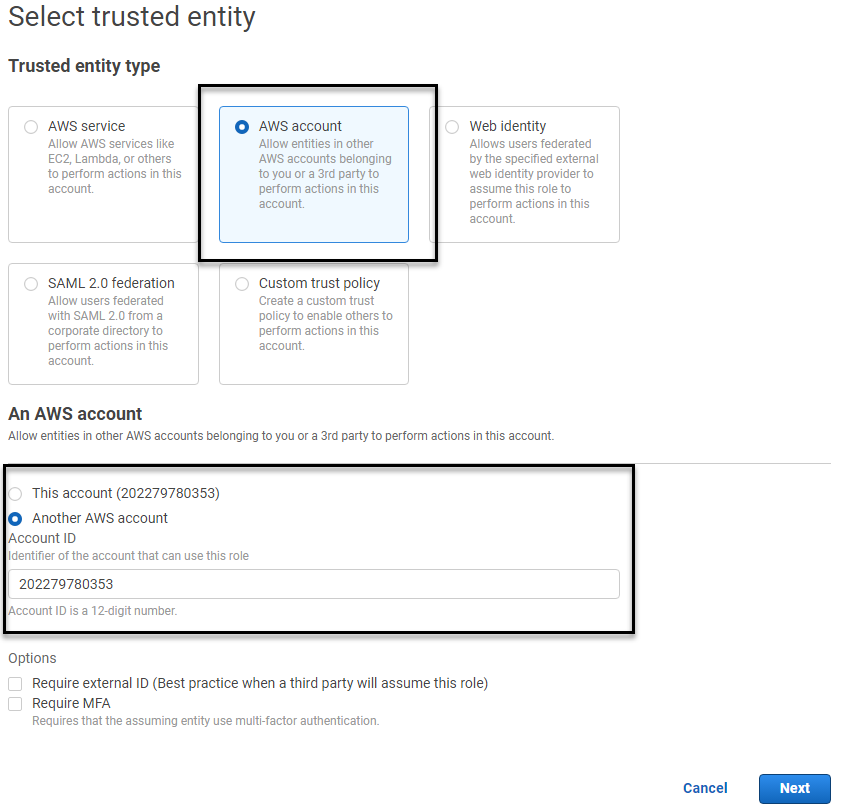
- Click Require external ID.
- For External ID, enter the external id that was auto-generated for you by nOps.
- Click Next.
- In Add permissions, check the box for the IAM policy you just created.
- Click Next.
- Enter a name and description for the role.
- (Optional) Add tags.
- Click Create Role.
- In the role list, find and click on the role you just created.
- Find and copy the Role ARN in the Summary page for the role and save it.
You have now completed the first part of the Manual Setup related to the AWS console.
Continue the Manual Setup of AWS account in nOps
Now that you have manually configured an IAM Role in your AWS account for access to AWS resources, the last step is to add that account to nOps.
You must now add information about the AWS role, S3 bucket, and CUR information so that nOps can fetch the billing data and asset information.
- Start from where you left off in Create an auto-generated External ID from nOps section.
- In the Account Details (Manual Setup) page, enter a name for the AWS account you are adding to nOps.
- The External ID is auto-generated.
- Enter the ARN of the IAM role.
- Add the S3 bucket name. Make sure the S3 bucket name is the same as the S3 bucket you created or selected for your CUR file.
- Enter the name of the Cost & Usage Report you created in step 4 of Create the Cost & Usage Report section.
- Enter the report prefix path that you created in step 6 of Create/Select the S3 billing bucket.
- Click Verify Details.
Link Cloud Accounts
nOps will check the account connectivity with AWS, and start the ingestion.
Fetching
After the initial data validation is complete, the setup process will automatically pull in the child accounts associated with your Organization account.
To onboard a child account, click either Automatic Setup or Manual Setup. If you don’t want to add a specific child account, click Proceed and Setup later
See Onboarding Linked Accounts and Onboarding With CloudFormation for more information about configuring Linked Accounts.
Related articles |
|---|