Onboarding your EKS clusters to Compute Copilot for EKS Karpenter
Why use Compute Copilot EKS?
Learn more about how Compute Copilot for EKS can help you to put your EKS cost optimization on auto-pilot here.
Pre-requisites:
- You must be logged in to your nOps account.
- You must have a Kubernetes cluster with Karpenter installed, version 0.33 or higher.
Steps to Configure Your EKS Cluster for BC+, Container Rightsizing, and Container Insights
Install the nOps Agent Stack
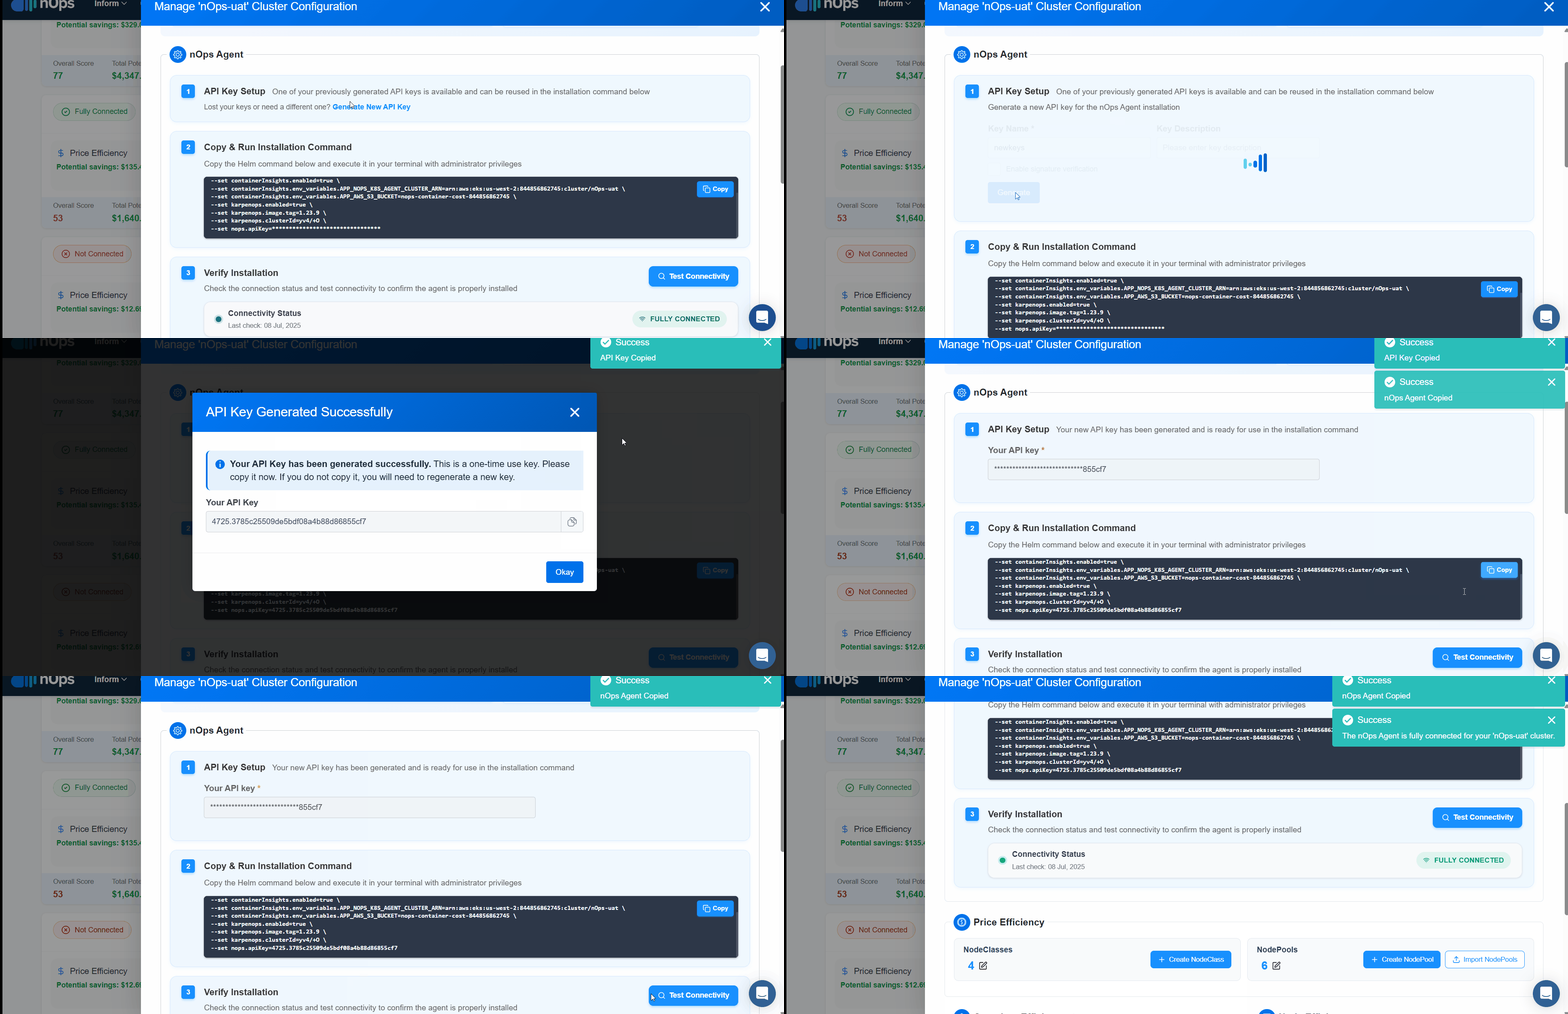
To install the nOps Agent click on the cluster's Configure to Optimize to begin data collection.
- API Key Setup : Generate a new API key for the nOps Agent Stack.
- Copy the custom command and run it in your command line.
- On Successful, Click Test Connectivity to confirm connectivity with the nOps Agent Stack.
How to Enable Container Rightsizing
After completing the IAM Roles and Permissions Setup and Installing the nOps Agent Stack, you can start configuring container rightsizing to optimize resource usage and reduce costs.
The nOps Container Insights Agent, a core part of the nOps Kubernetes Agent Stack, will now start collecting data on the actual resource consumption of your Kubernetes workloads. This data is used to generate rightsizing recommendations, helping you optimize CPU and memory allocations for better efficiency.
For detailed steps on enabling container rightsizing, refer to the Container Rightsizing Documentation.
Steps to Configure Your EKS Cluster for Price Efficiency
After completing the Terraform or CloudFormation setup and installing the nOps Agent Stack in your cluster, you can proceed with the final configuration for Price Efficiency.
Create EC2NodeClass
EC2NodeClass can be created in two ways:
-
Auto Configuration
-
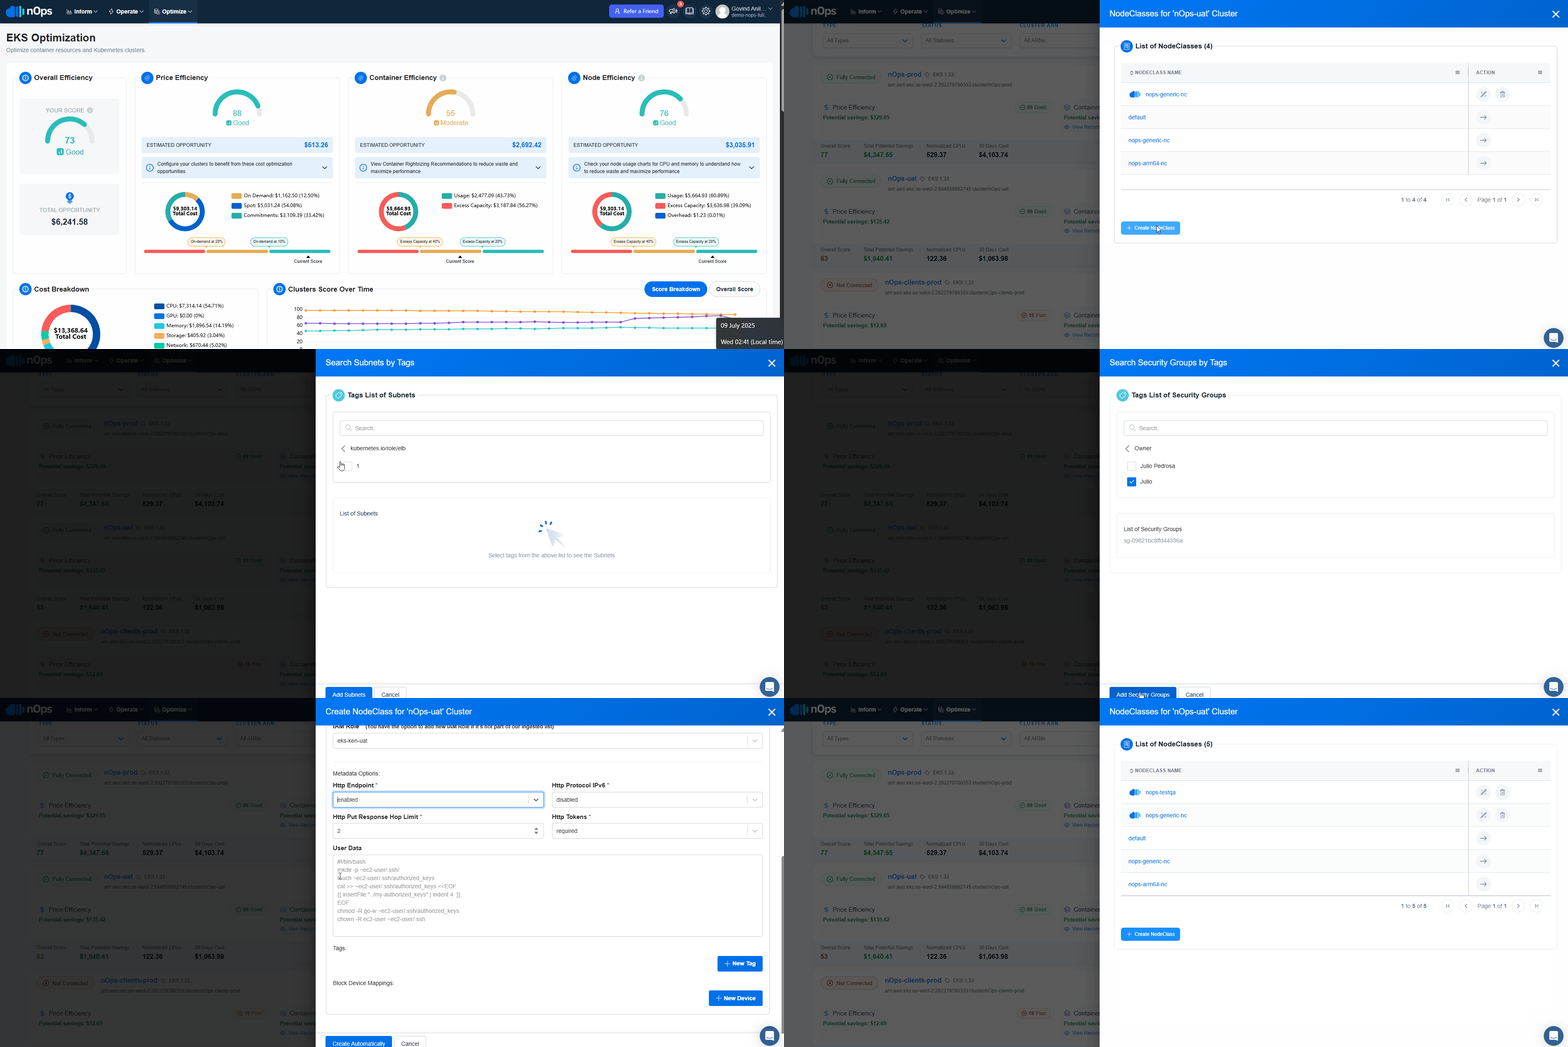
For the selected EKS cluster, Select create a NodeClass on Configuration page.
-
Assign a unique name to it.
-
Choose the AMI Family from the dropdown menu.
-
Add Subnet IDs manually or with Search by tags.
-
Add Security Group IDs manually or with Search by tags.
-
For EC2NodeClass, you have to select the IAM Role to be used. In case you're not seeing the desired role in the list, you can manually insert your role name.
-
Configure Metadata Options with user data to give commands after node starts [optional].
-
Create Device Mapping by providing necessary details [optional].
-
Click on Create Automatically and nodeclass will be created.
 note
noteyou can create multiple node templates
-
-
Manual Configuration
-
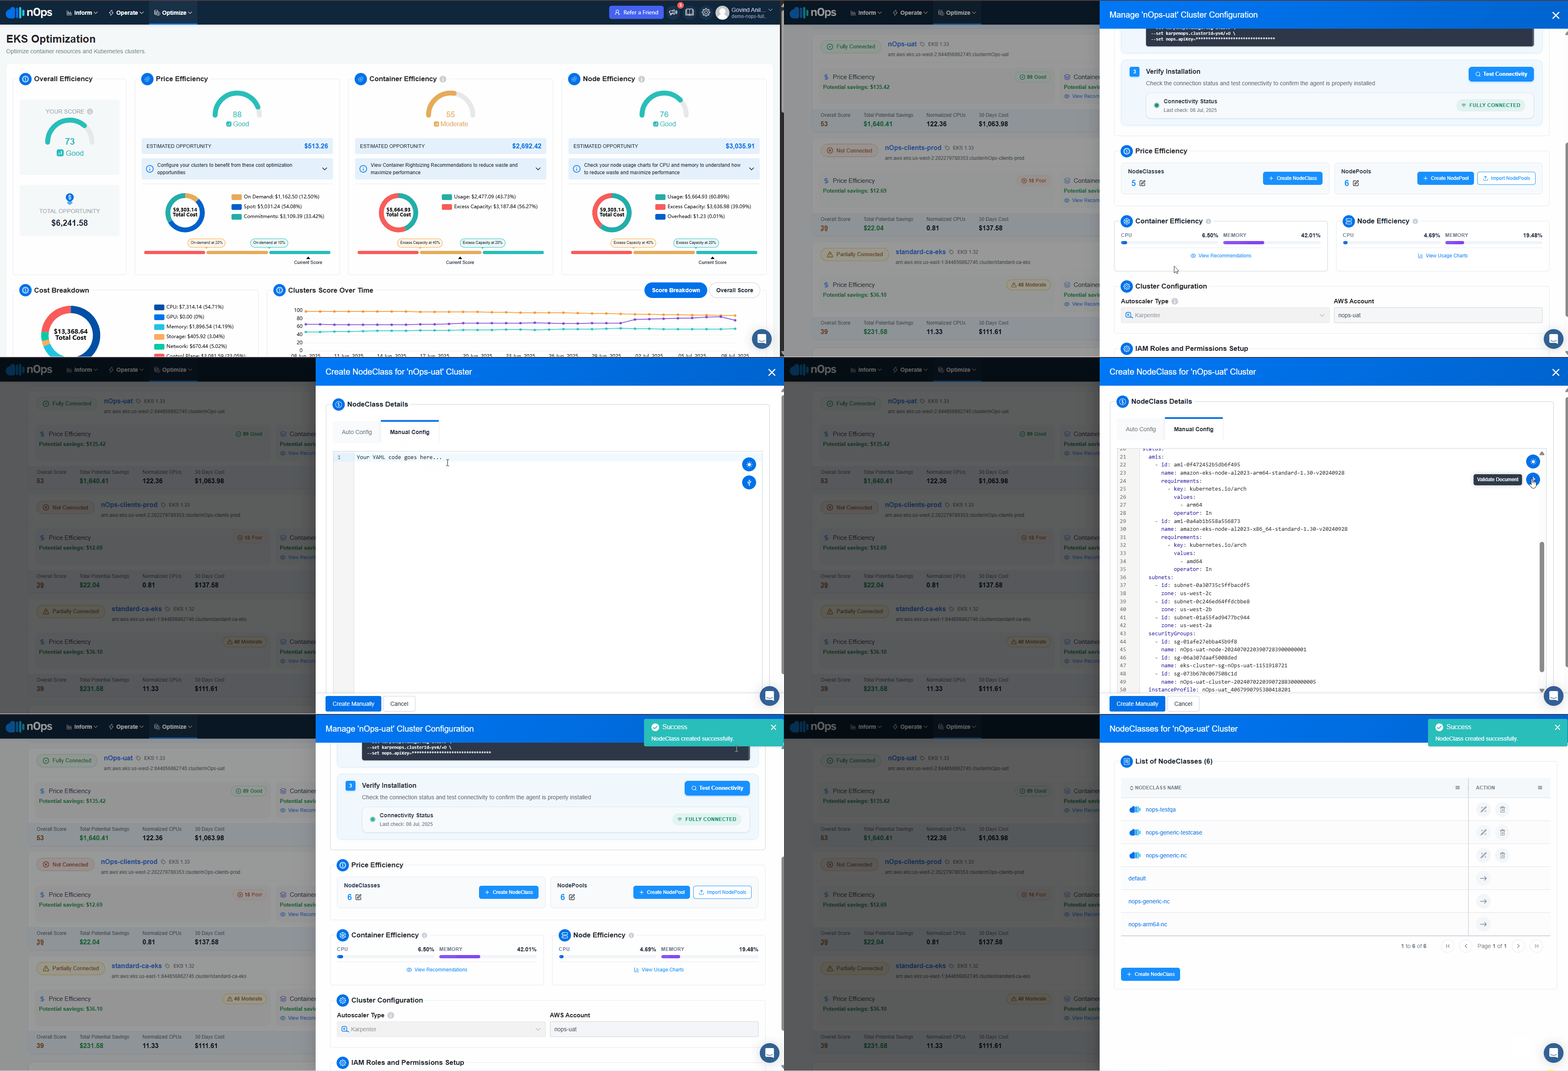
For the selected EKS cluster, select create a EC2NodeClass.
-
Insert the YAML code and validate it. Make sure you specify an unique name under metadata.name property for your resource
-
Now select Create manually.
 note
noteIn the NodeClasses list you can find resources created without nOps if there are any. These are going to be shown without the nOps icons and will be available only in Yaml format in View Mode. When creating NodePools, you can select any NodeClass as reference, either created via nOps or directly created in the cluster by you or your team.
-
Create NodePool
NodePool can be created in Three ways:
-
Import Your NodePool
Import your Node Pools, and nOps will handle the rest. Once you import, you can make any changes to the Node Pools in your code repository and they will automatically sync with nOps. This eliminates manual overhead and facilitates centralized management, ensuring your configurations are always in sync and optimized to prioritize performance.
-
To import Node Pools, simply click the
Import Nodepoolbutton on the Cluster Configuration page. This will instantly create an nOps copy linked to the original version and send it for deployment into your cluster.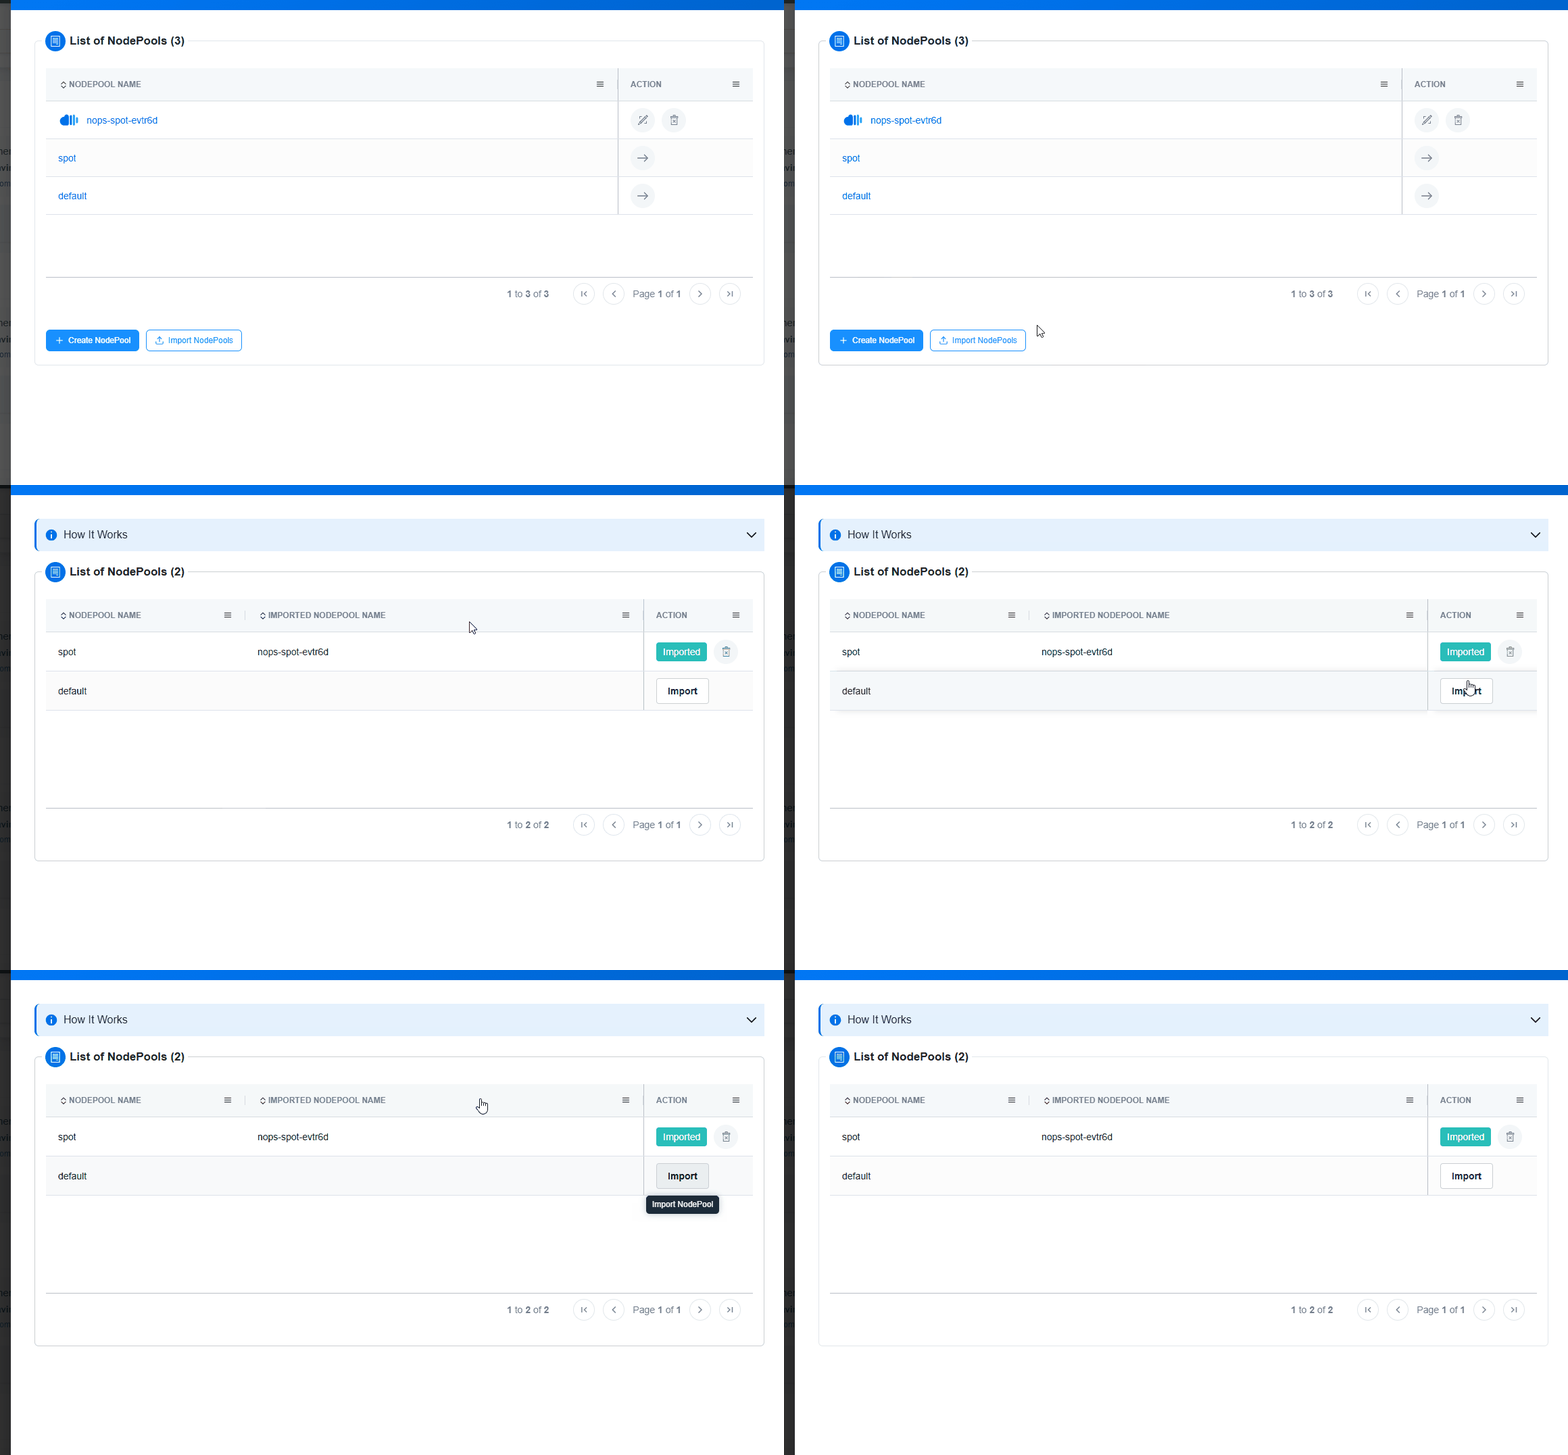
-
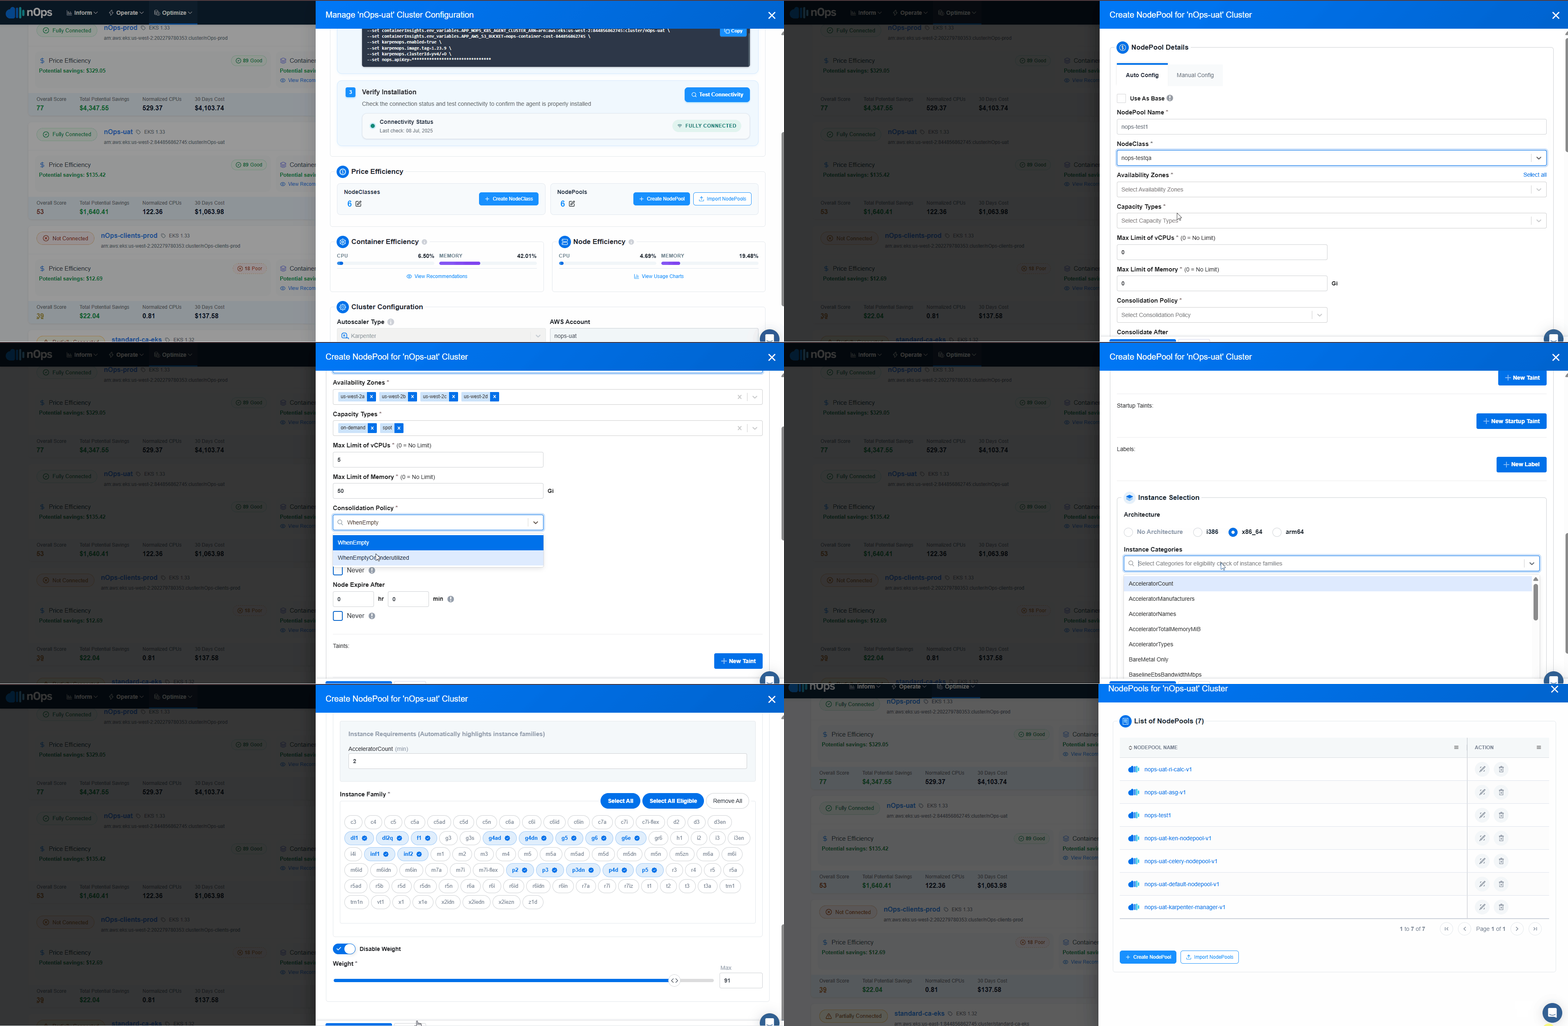
Auto Configuration
-
For the selected EKS cluster, select create NodePool.
-
Assign a unique NodePool name.
-
Select the created EC2NodeClass to pull configuration from.
-
Select Availability Zones.
-
Select Capacity Type — Spot, On Demand or both [recommended to select both]
-
You have the option to select Max Limit of vCPUs & Memory. Using 0 in both fields will indicate Karpenter to apply no limits when allocating resources.
-
Create Taints and Labels if required [for specific provisioner service].
-
For instance selection section, you have the option to filter the types by Architecture, Generation, Accelerator details, Networking, Storage and others. After the filtering is done, you can click Select All Eligible Instance Families for autoselection.
-
Set the weight (optional)
-
Now select Create Automatically.
 note
noteYou can create multiple NodePools, but each NodePool will have only 1 Node class.
-
-
Manual Configuration
- For the selected EKS cluster, select create NodePool.
- Insert the YAML code and validate it. Make sure you specify an unique name under metadata.name property for your resource and also add the correct reference to the desired NodeClass under spec.template.spec.nodeClassRef.
- Now select Create manually.
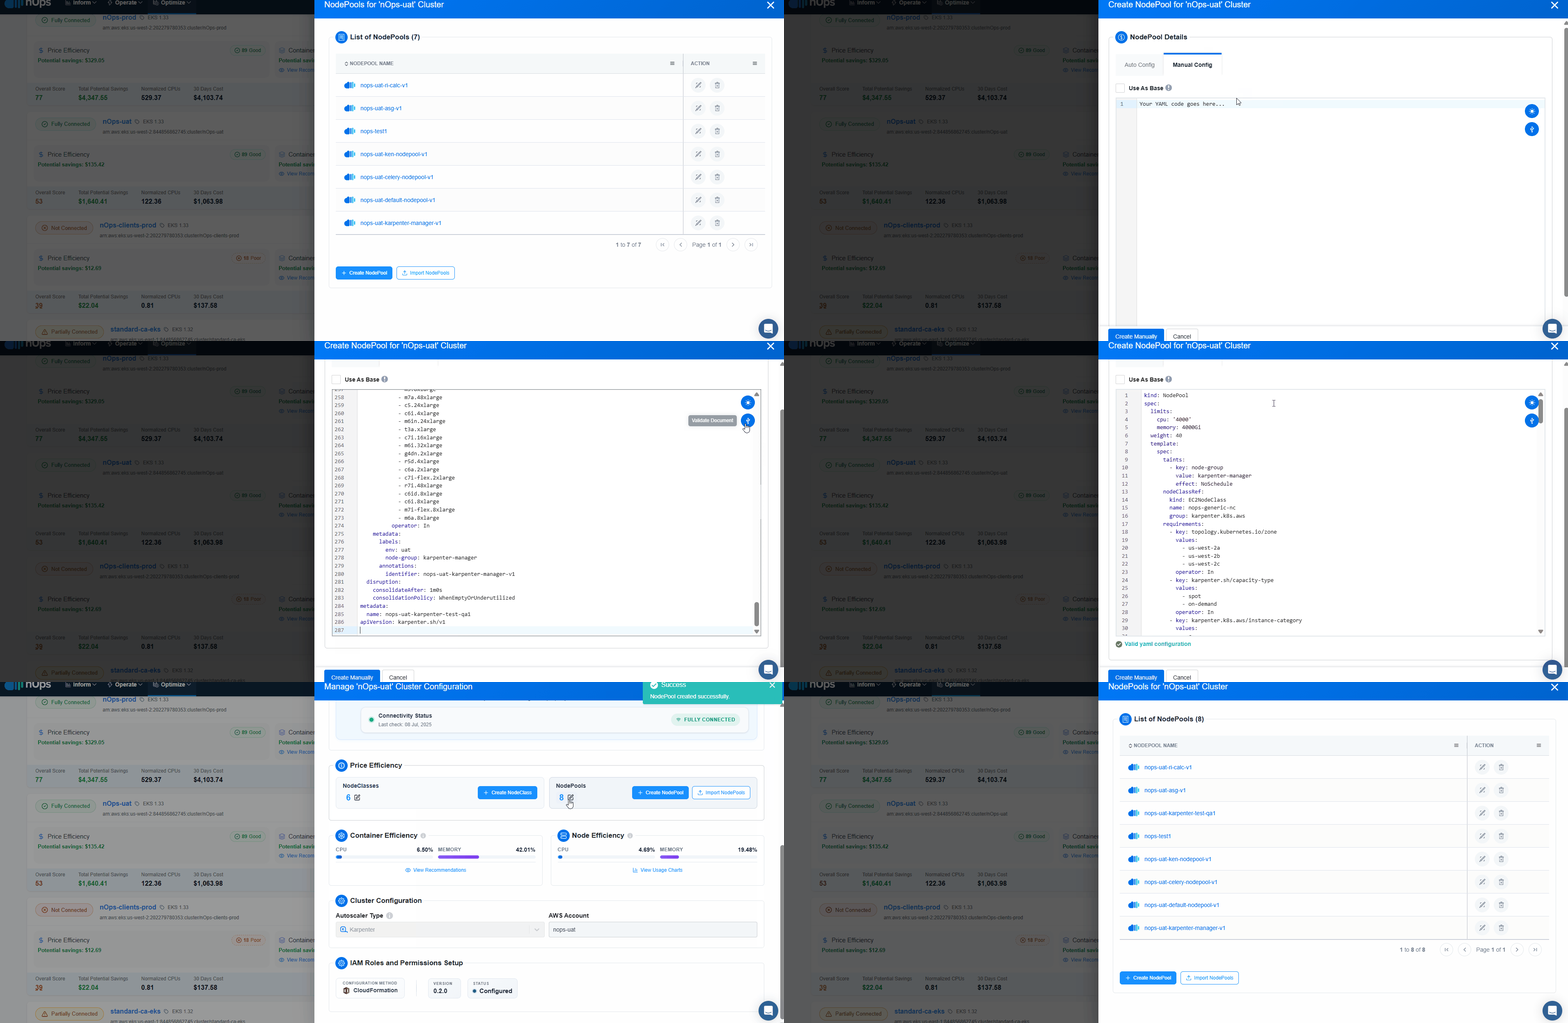
As soon as cluster status displays Configured, Compute Copilot for EKS will start its magic to generate savings on the connected EKS cluster.
FAQ
-
Is Karpenter mandatory to install EKS Compute Copilot?
- No, EKS Compute Copilot now supports both Karpenter and Cluster Autoscaler. However, we recommend migrating from Cluster Autoscaler to Karpenter for better node efficiency and automation, since Karpenter dynamically adjusts node sizes based on workload demands.
- Note that Karpenter or Cluster Autoscaler are only required for Price Efficiency. Neither is required for Container Rightsizing or Container Insights.
-
Do EKS Compute Copilot Karpenter NodePools take precedence over my own Karpenter NodePools?
- Yes. Once onboarded to Compute Copilot, the NodePools already existing in the cluster are not going to be used anymore. But you don’t necessarily need to delete them. It’s just that they will not be used while Compute Copilot NodePools are there. Note: It may not always be true depending on the existing NodePools configuration.
-
Can we import the YAML for existing node class and NodePools to configure Compute Copilot EKS NodePools?
- Yes, you can still use your existing YAML code. However, we now offer a new import feature that allows you to import your existing node classes and node pools directly. The Create NodePool section of this documentation explains how to import node classes and node pools, making the configuration process easier.
-
Does nOps provide DevOps support to customers migrating from cluster autoscaler to Karpenter?
- nOps has experienced engineers who provide free of cost support to all clients to help them with Karpenter migration. You can get as much on-call support as you need to review your Karpenter settings. We also conduct monthly “Karpenter Office Hours” with our existing customer audience to build a community where we can share our experience, customers can ask questions in an open forum, see hands-on to some basic Karpenter implementation practices and much more. However, nOps is not a Service company and therefore, we do not take responsibility for your migration project or provide dedicated DevOps resources or do managed services. Our support is limited to only providing guidance and reviews. Note: If you want a recording of the most recent “Karpenter Office Hours” then please drop us an email on ‘support@nops.io’.
-
Does nOps Compute Copilot for EKS support configuration of Multiple NodePools while setting up nOps Karpenter provisioner?
- Yes, absolutely. Setting up multiple NodePools is a very common thing that customers ask for and we have made it very user friendly to configure that. You get two options to do it, configure in the UI using Auto Config or configure via existing YAML template import using Manual Config method.
-
I have multiple applications running on the clusters which have different instance requirements, can Compute Copilot support different instance types in such cases?
- Yes, Compute Copilot does allow you to pick & choose only those instance types that you’d want nOps Karpenter provisioner to provision.
-
Is it possible to set minimum threshold values for metrics like CPU and Memory while configuring my Karpenter provisioner in Compute Copilot?
- Yes, we allow users to set the minimum CPU and Memory metrics
-
Can I put my Stateful workloads on EKS Compute Copilot?
- EKS Compute Copilot does not come with any limitation on Stateful workloads. However, we do not recommend putting Stateful Workloads on Spot Instances if they are running mission critical operations.
-
How can I identify resources managed by Compute Copilot EKS?
- Compute Copilot EKS adds a common tag to all resources it manages. This is accomplished by automatically adding a tag in the
spec.tagssection of AWSNodeTemplates. The value of the tag isnops:nks:enabled=trueand it will appear on all EC2 managed by Compute Copilot EKS.
- Compute Copilot EKS adds a common tag to all resources it manages. This is accomplished by automatically adding a tag in the
-
What is the architecture of the CloudFormation Stack?
- The stack automates the process of creating and managing IAM roles for EKS clusters, ensuring the proper roles are associated with the service account used by the nOps Agent Stack.
 note
note- Optional IAM User Support: The template can also handle situations where an IAM user might be needed, making it suitable for environments lacking OIDC identity providers.
- Onboarding Confirmation: The Lambdas send a request to nOps to confirm CloudFormation onboarding.
-
What is the architecture of the nOps Terraform module?
- The Terraform module is hosted in the public Terraform Registry, allowing customers to use it as a source in their own Terraform configurations.

For each AWS account and region where clusters exist, customers apply the Terraform module. This process:
- Creates an S3 bucket and IAM roles for each cluster, enabling the agent to export data.
- Creates a cross-account role for the backend, allowing it to copy data into the platform.
Additionally, nOps APIs ensure that:
- Each cluster has the necessary IAM roles for agent installation.
- The S3 bucket is registered in the backend table, triggering the data copy workflows.