How to use Okta SSO for nOps
To enable single sign on for Okta users, you must configure an Application Integration in Okta and enter information into nOps
Information on creating an Application integration for Okta is also available through Okta online help.
After set up is complete, first-time users may need to confirm login permissions using the confirmation email.
You will need to copy and paste information from nOps into Okta and then from Okta to nOps. For ease of use, we recommend that you open 2 browser windows and log into both Okta and nOps as an Admin user.
The process contains the following steps:
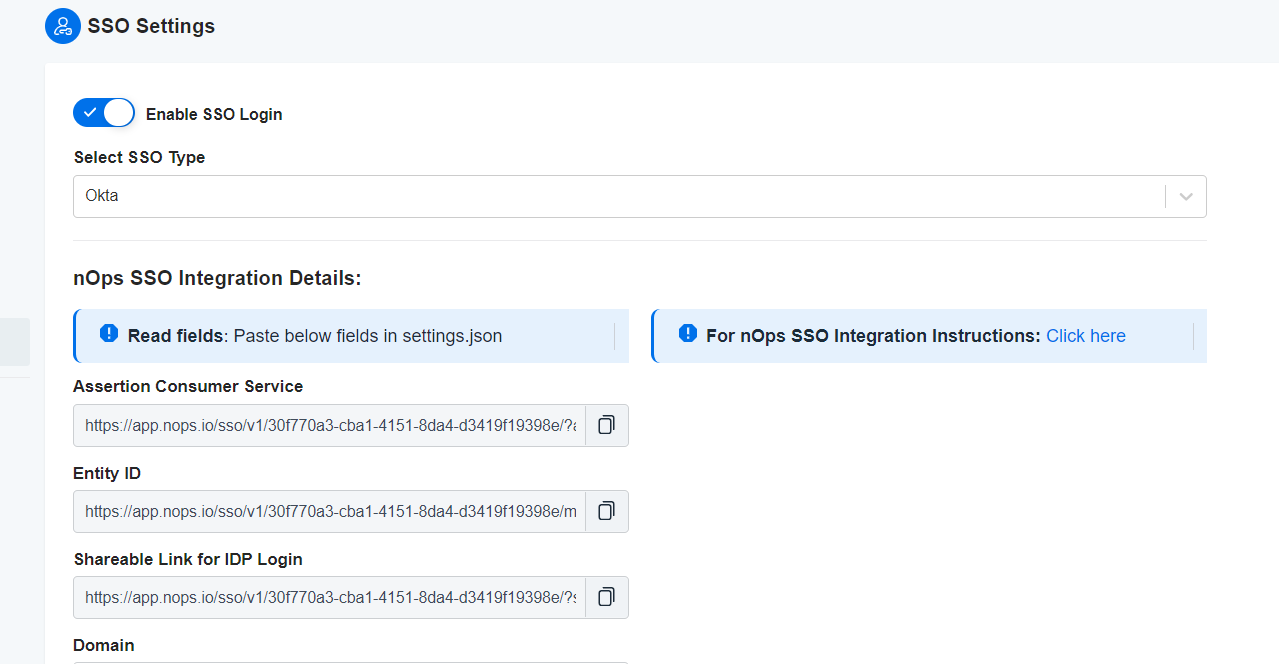
Step 1: Information you need from nOps
Before you can set up nOps as an App in Okta you will need the following information from nOps.
-
Log into nOps as an Administrator user.
-
From nOps, open Organization Settings and navigate to the SSO integration page.
-
Enable the SSO setting by using the toggle.
-
Select Okta from the dropdown list.
-
Copy URL information from the following fields in nOps, to add to OKTA in the next step.
-
Assertion Consumer Service
-
Entity ID
-
Step 2: Setup Okta SAML 2.0 Application
-
Log into to Okta as an Admin user and navigate to Applications page
-
Click Add Application
-
For platform select Web.
-
For sign on method, select SAML 2.0
Instructions for creating SAML app integrations are also available on the Okta website.
-
-
In General Settings enter an App name and click Next.
App name suggestion: nOps. -
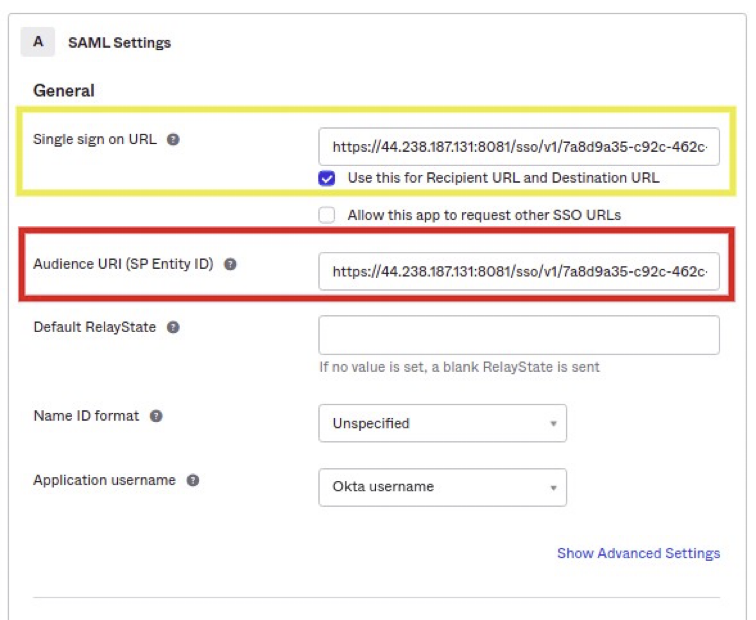
In the SAML settings page, enter information from nOps copied by you in Step 1:
-
In the Okta Single Sign On URL field enter AssertionConsumerService URL from nOps.
Select the: Use this for recipient URL and Destination URL checkbox. -
In the Okta Audience URI (SP Entity ID) field, enter EntityId information from nOps.
-
-
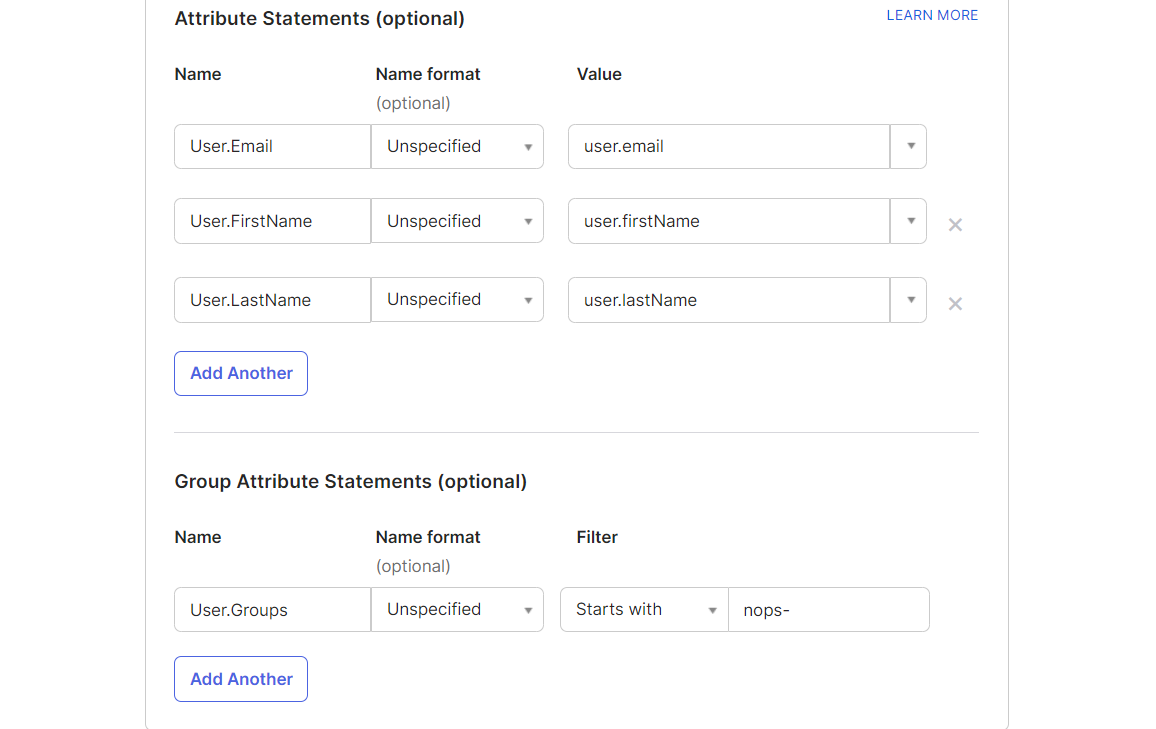
Add the following Attributes and Group Attribute from the Attribute Statements (Optional) page.
IMPORTANT: This information is a mandatory requirement .
nOps Single Sign-On will not work if these are NOT configured.Ensure that you select the corresponding Value in the dropdown on the right.
The name values for the configurations are case sensitive.
Enter them exactly as seen. Click Add Another if or when you need to add additional statement rows.
There is information on the nOps page about setting up attribute and group attribute statements. See also How to create a group in Okta.</br> IMPORTANT: A group name cannot contain any spaces and group name must be start with ‘nops-‘. You must add all potential users of nOps in the Okta group that you create.
You must provide the Okta group name on the nOps SSO dialog to enable the group and allow access. -
In the next step, select: I’m an Okta customer adding an internal app.
-
After the app is created, click View Setup Instructions.
Copy the following items from OKTA to nOps
| From Okta | To nOps SSO setting field |
|---|---|
| Identity Provider Single Sign-on URL | SAML 2.0 Endpoint (HTTP) (singleSignOnService URL) |
| Identity Provider Issuer | Issuer URL (entityid) |
| X.509 Certificate | X.509 Certificate |
Step 2B: From Okta, Assign Users to the nOps application
Only users assigned to use the nOps app you created, are enabled to use SSO when signing into nOps. You can do this step at any time and can edit users (Remove or Add) using this procedure.
-
Under Directory from the main menu choose People.
-
Click Add Person and enter information about the person.
-
Click Save or Save and Add Another to add additional persons who will need SSO access to nOps.
-
When you are done you should see a list of people in the Okta account.
-
For each person you added, click Activate to activate the Okta SAML application.
-
Go to Applications under the main menu and click on the Okta nOps SAML application you created.
-
Under the Assignments field click Assign and find persons you want to assign to this application.
Refresh your Okta application to let the changes take effect.
-
You should now be able to see the nOps application you created in your Okta account.
-
Clicking on the nOps app should take you to the nOps website to confirm the SSO login.
nOps will send you a confirmation email.
-
Click the email confirmation to login using SSO.
Step 3: Finish setting up nOps Configurations
Next navigate to the nOps SSO page. Ensure that you have copied the information from Okta.
| From Okta | To nOps SSO setting field |
|---|---|
| Identity Provider Single Sign-on URL | SAML 2.0 Endpoint (HTTP) (singleSignOnService URL) |
| Identity Provider Issuer | Issuer URL (entityid) |
| X.509 Certificate | X.509 Certificate |
SAML configurations for attribute and group attribute mappings. Use the following mappings:
| Map this Attribute value | To this Attribute name |
|---|---|
| User.Email | |
| First Name | User.FirstName |
| Last Name | User.LastName |
| Groups | User.groups |
Defining Roles and groups.
In the UserRoles/Groups section of the nOps SSO dialog:
Enter the name of the group you created in Okta in the Client Admin Groups or Client User Groups fields. Users of the group will have access to nOps through single sign on.
You can also check the box to specify whether the SAML group configuration can override their nOps role.
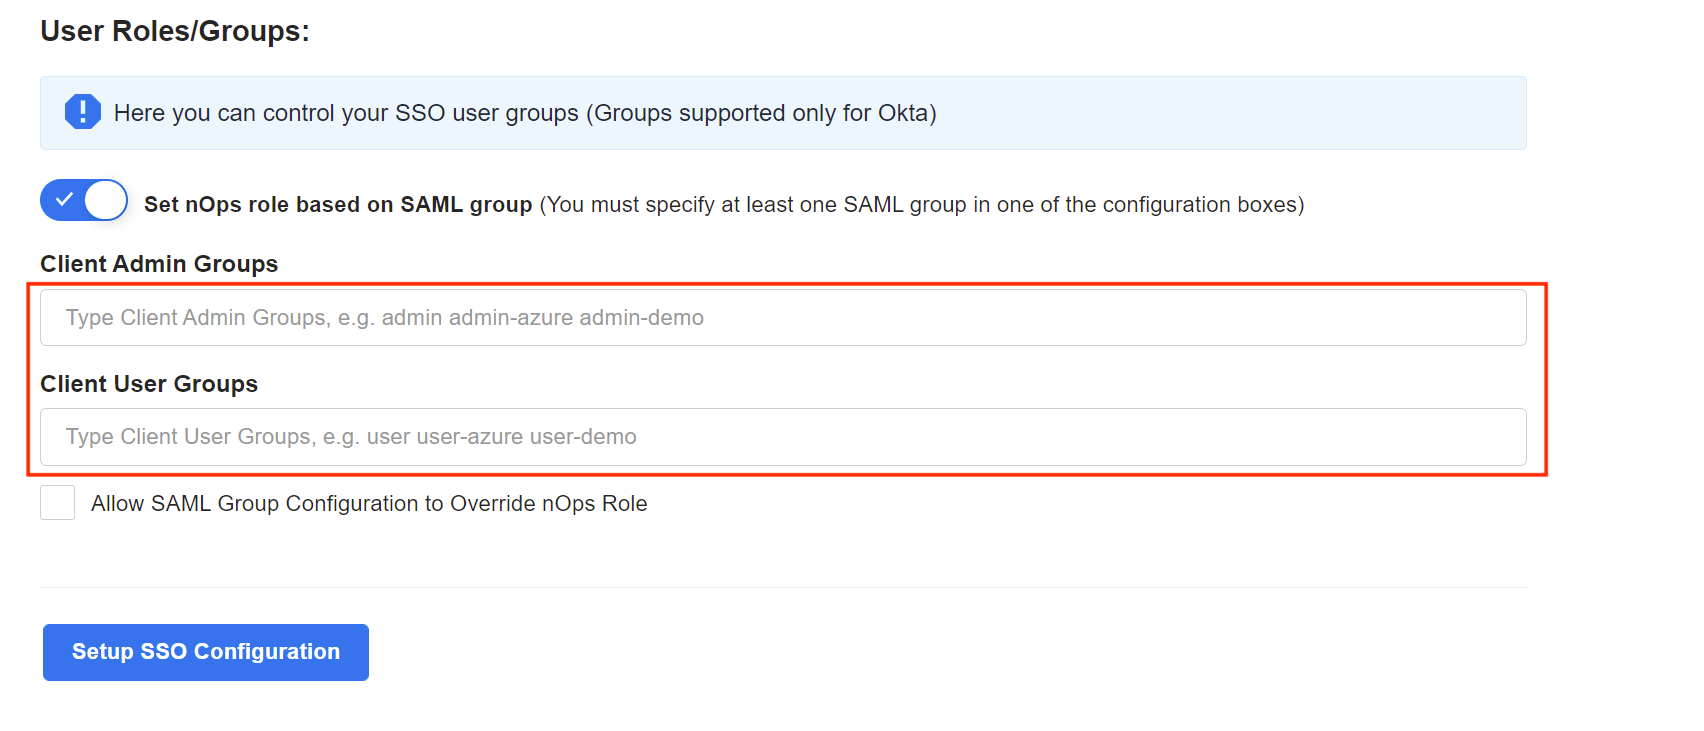
When you are done click Setup SSO Configuration.